Setup
Last update:
Here you can find the steps to set up your computer for FCB. Depending on the operating system of your computer, you may have to follow different steps. Here, you will find those steps separately for Unix, Windows and macOS when necessary. It is recommended that you install the software tools in the order given here.
- Unix shell
- Setting up a regional configuration
- Git version-control system
- Text editor
- Python and Jupyter Notebook
- Python modules
- R and RStudio
- Pandoc
- Makefile
If you have a tablet device, then it is probably running either Android (Samsung Galaxy Tab, etc.) or iOS (iPad). You will also find below instructions for such devices but at some point it may become easier for you to work with a computer. In any case, it is recommended that you use some external keyboard with your tablet.
Very important: whenever you find below instructions that ask you to
type some commands starting with a dollar sign ($), such as:
$ some command to type
You should NOT type the starting dollar sign ($), because it is just a convention,
called the
command prompt,
to indicate that you should write the given commands in the
Unix shell running within
the terminal window application.
Unix shell
Unix
If you have a computer running some flavor of the Unix operating system, such as Ubuntu, RedHat or CentOS, you don’t need to do anything because you alredy have direct access to the Unix shell through the terminal window.
Windows
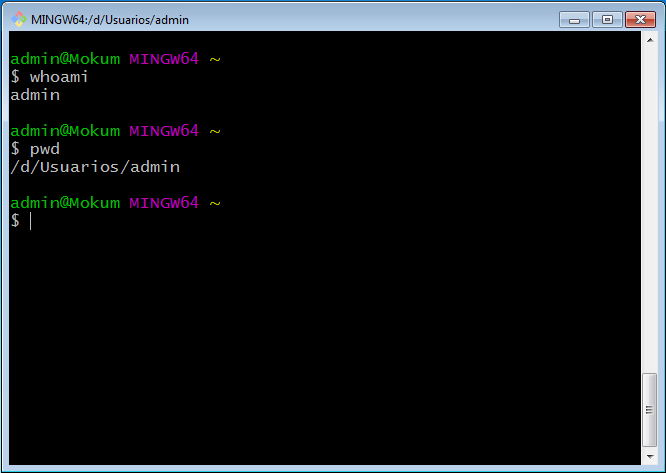
If you have a computer running the Windows operating system, then you can install GitForWindows, which will provide you a Unix shell within Windows through its tool Git Bash. You can find very detailed instructions, including a video, on how to setup and configure GitForWindows in this link from The Carpentries organisation.
The Git Bash application will open a terminal window that should look similar to this one below.
macOS
If you have an Apple computer running the macOS operating system, then you already have a Unix shell available through the Terminal app. However, you still need two more software components to facilitate working and installing additional software from the command line:
- Xcode Command-Line Tools (CLT).
Open the Terminal app and type the following instruction:
$ xcode-select --installDo not misinterpret this step as installing the whole of Xcode, which is the MacOS suite of developer tools and in any case do not attempt to install the whole of Xcode, because we do not need it for this course. You may be getting a popup window like this one here below.
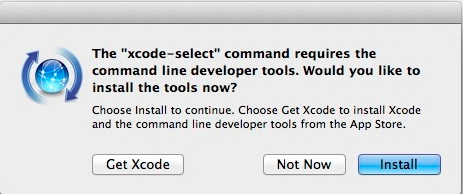
In such a case, press the default
Installbutton.If you get an error about not being able to install the software because it is not currently available from the Software Update Server in another popup window similar to this one here below.
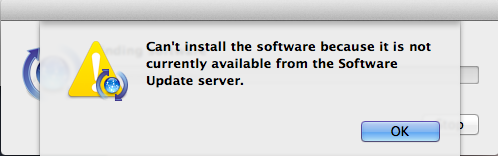
Then, you should go to the Apple developer site with your Apple user credentials, by following this link:
https://developer.apple.com/download/more/?=command%20line%20tools
Click on “Command Line Tools for Xcode version”, where version should be the latest non-beta version (as of September 2021 is Xcode 13), and you will see a pull-down menu similar to the one here below.
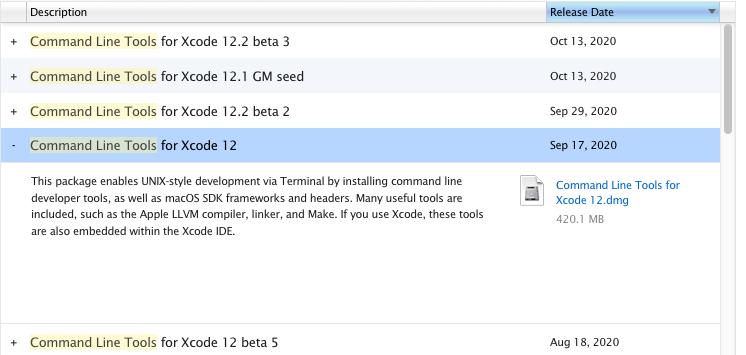
Click and download the
.dmgfile link. This is an Apple installer file that, once opened, it should install the Xcode CLT software in your system. - Homebrew. Type the following instruction in the terminal window:
$ /bin/bash -c "$(curl -fsSL https://raw.githubusercontent.com/Homebrew/install/master/install.sh)"Pay attention to the fact the installation process may ask you to confirm to proceed by pressing the
Enterkey and eventually type your user password as well. Once the installation has finished, you can check whether it has been successful by typing the following command:$ brew doctor Your system is ready to brew.If you get the previous output message, you are ready to use Homebrew.
Android
If you have a tablet running Android, then you already have a Unix system but you still need a terminal emulator app. There are a few options, but probably the best one for our goals here is Termux. You can find further details on how to install and use Termux in Android in the following link.
iOS
If you have a tablet running iOS, then you already have a Unix system but you still need a terminal emulator app. There are a few options, but probably the best one for our goals here is iSH.
Setting up a regional configuration
Operating systems such as Linux, Windows or macOS, have some default
regional configuration that establishes things such as the input language
and keyboard layout or the
decimal separator for
real numbers. Applications such as text editors or spreadsheets take that
configuration into account when parsing the text we type or the data files
we open into the software. This is also the case of the Unix command sort
that you may want to use from the Unix shell running in the Terminal window,
which looks up what the
decimal separator has been
set up by the regional configuration, when using the option -n to rank real
numbers.
Many data sets with values corresponding to real numbers have their fractional
part separated from the integer part using the dot (.) as
decimal separator. If the
regional configuration of our operating system assumes that the
decimal separator is a
comma (,), which happens with systems configured with the Spanish, French
or Catalan language, to name a few, then the Unix sort command is going to
rank incorrectly those real numbers that use the dot (.) as
decimal separator.
One straightforward way to test whether the sort command correctly ranks
real numbers that use the dot (.) as decimal separator is with the
following command line:
$ echo -e '0.11\n2.22\n5.0' | sort -nr --debug
Using collate rules of en_US.UTF-8 locale
Decimal Point: <.>
Positive sign: <+>
Negative sign: <->
5.0
2.22
0.11
which should show the numbers 5.0, 2.22 and 0.11 in this order exactly.
The sort option --debug may further explicitly tell us what character is
being used as
decimal separator just as
in the example above, although in some systems it doesn’t.
In case the sort command does not rank correctly real numbers with the dot
(.) as decimal separator, we should switch our current regional configuration
to the one of a country that uses that convention, such as for instance the
USA. This process is different depending on the operating system and terminal
application we are using. Once you have switch the regional configuration,
check out again with the previous command line whether the sort command now
ranks real numbers correctly.
Unix
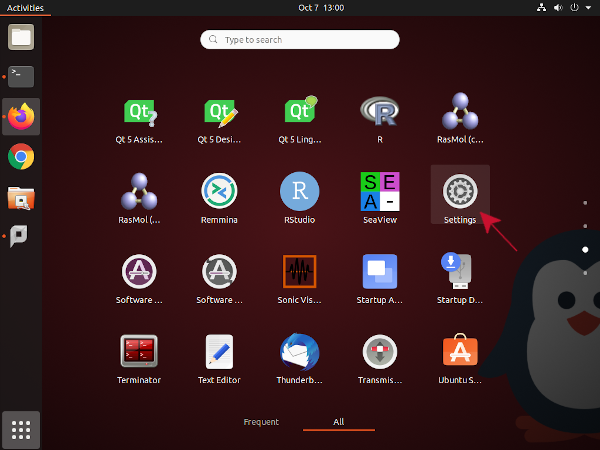
If you are using some recent version of Ubuntu then you should follow these steps (look up the red arrow in the screen captures):
1. Open the Settings application.
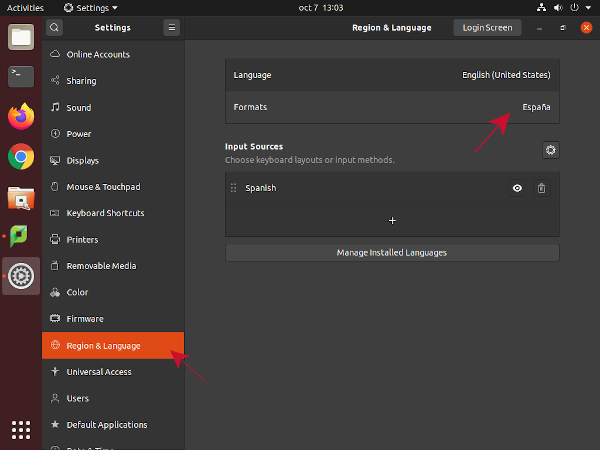
2. Go to the section Region & Language and double-click on the section Formats.
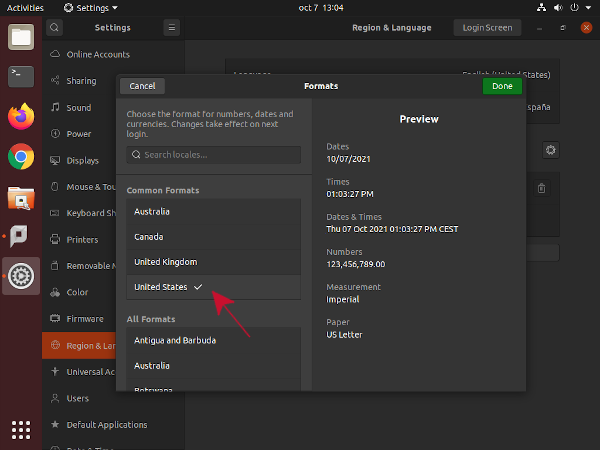
3. In the popup window, click on United States and then the button Done.
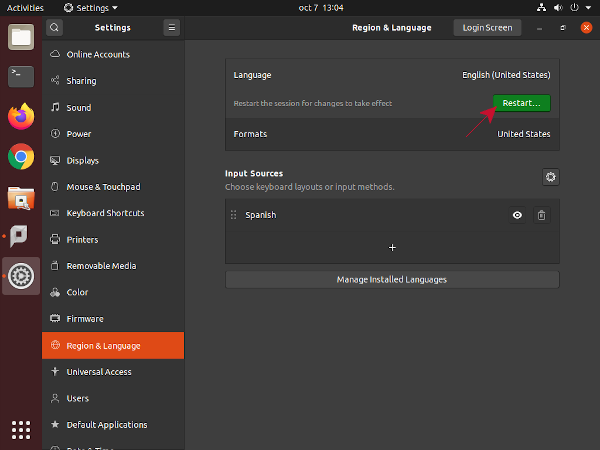
4. Finally, the region and language preferences window now displays a button
with the label “Restart…”, click on it and the system will log you out,
which is necessary to have the changes taking effect. When you log in again
the regional configuration that handles the
decimal separator should
have changed to use the dot (.) for that purpose.
Windows
In the Git Bash application that emulates a terminal window, we should click
on the Git Bash logo at the top-left of its window and select Options....
A popup window should appear similar to this one below.
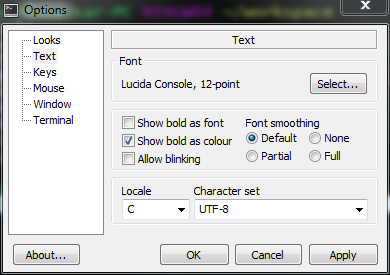
In this popup window, we should first click on the section called Text from
the left panel. Then, we should click on the pull-down menu called Locale
and select the option C. Finally, we should click on Apply, then Save,
close the Git Bash application and next time we open it again, it will work
with a regional configuration in which the dot (.) will now work as decimal
separator character.
macOS
Open the application of system preferences, click on the icon of
Language & Region preferences and you should see the following popup window
here below.
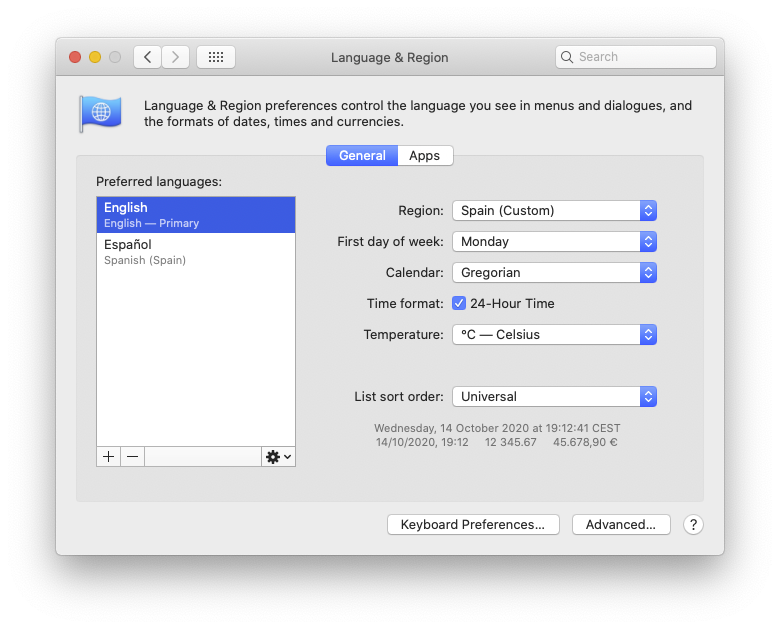
In this image we already see two available regional configurations, English and
Spanish. If you do not have the English one, then press on the button with the
+ sign and add an US English configuration. Once this English configuration
has been added, close the terminal application and open it again.
Git version-control system
Unix
If you have a computer running some flavor of the Unix operating system, such as Ubuntu, RedHat or CentOS, probably the git version-control system is already installed. Check it out by opening a terminal window and typing the following in the shell:
$ which git
If typing the previous instruction gives no answer, then the git version-control software is not installed in your Unix system. To install it go to the following page and follow the instructions, according to the Unix distribution you have in your computer.
Windows
If you have a computer running the Windows operating system, then you can install GitForWindows, which will provide you the git version-control system. If you already installed it before to have the Unix shell, then you don’t need to do anything else.
macOS
If you successfully installed the X-code CLT, then you should already have Git install in your macOS system. You can check that out by typing in the shell of the terminal window:
$ which git
/usr/bin/git
If you get an error, then go to the previous section and install the Xcode CLT.
Android
If you have a tablet running Android, once you have installed the Termux app (see previous section), open the terminal window and type:
$ apt update
$ apt upgrade
If both commands execute successfully, then you can type the final
command that will install Git and other component called openssh, which is
also necessary for Git.
apt install git openssh
Once this installation is finished, you should type:
$ termux-setup-storage
This command will probably cause Android to ask you to allow the app to access storage. You should grant that access. You can find more details on the installation of Git in an Android device in this link.
iOS
If you have a tablet running iOS, once you have installed the iSH app (see previous section), open the terminal window and type:
$ apk add git
Text editor
We need a text editor to edit scripts and programs. The Microsoft Notepad is a text editor but Microsoft Word or Apple Pages are not. For scripting and programming is always best to use an editor with syntax highlighting (Notepad has no syntax highlighting). The specific editor you may want to use depends on what editor you feel most comfortable working with. The available options can be splitted into two types of editors: classical and modern ones. Classical text editors can work in text mode only, i.e., you can use them remotely through a text connection, but modern editors are easier to use for newbies:
- Classical text editors (available in nearly every Unix system):
- Modern text editors with a graphical interface:
If you want to use a classical editor in a macOS system, check out first whether
is already available in the shell via which nameofeditor and if not, use
Homebrew to install it via brew install nameofeditor, where you should
replace nameofeditor by the name of the editor application.
Python and Jupyter Notebook
There are two major versions of Python, 2.x and 3.x, and they are not compatible. Because Python 2.x is no longer maintained and progressively more code is being developed for Python 3.x, it is recommended that you install Python 3.x in your computer.
Unix
If you have a computer running some flavor of the Unix operating system, such as Ubuntu, RedHat or CentOS, probably Python 3.x is already installed. Check it out by opening a terminal window and typing the following in the shell:
$ which python3
If typing the previous instruction gives no answer, then the Python 3.x software is not installed in your Unix system. The specific package manager software that you can use to install Python 3.x depends on your specific Unix distribution. You can find instructions for different distributions in the following link.
Once Python 3.x is installed, you can install Jupyter Notebook by typing:
$ pip install jupyter
Windows
If you have a computer running the Windows operating system, then you should follow these steps:
- Go to the Python downloads for windows page, follow the link for the Latest Python 3 Release and in the next page scroll down until you find the link to download the latest stable Windows x86-64 executable. If your system has a 32-bit processor, then you should look for the link of the 32-bit installer. Follow that link and once the download has finished, execute the installer program you have just downloaded.
- During the installation, select the option Add Python to PATH and use all the other default options.
- To check whether the Python 3.x installation was successful open the Git Bash
terminal window and type:
python3 --version
In some versions of Windows, after following the previous steps, your terminal
window may become unresponsive after calling the executable python or python3
without giving any sort of error or message. In such a case, close the terminal
window, answering Ok to the popup that tells you that there is process running,
open again the terminal window and type the following instruction in the Unix
shell command line:
$ echo "alias python='winpty python.exe'" >> ~/.bashrc
After restarting the terminal window, the python executable, or python3,
should work fine. Another different and problematic situation could be the
following one. If when trying to execute python, or python3, you encounter
the following error:

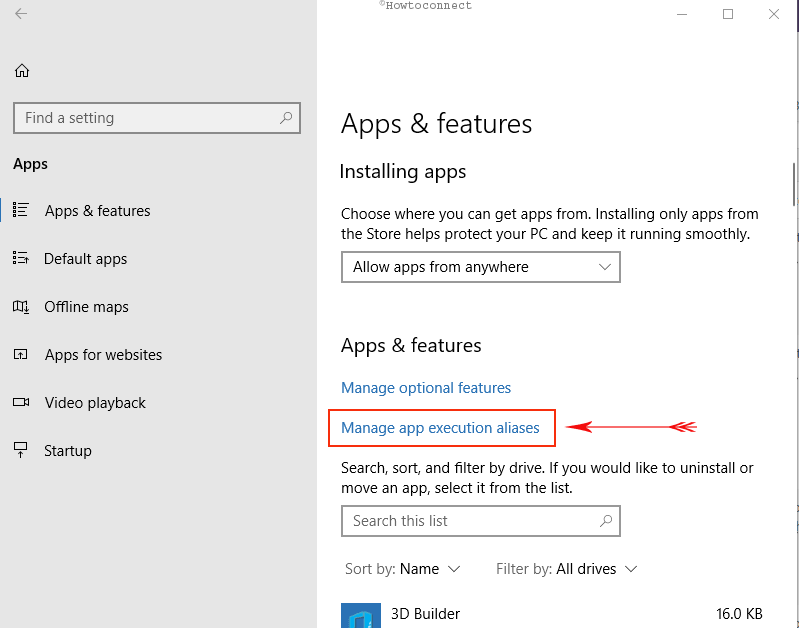
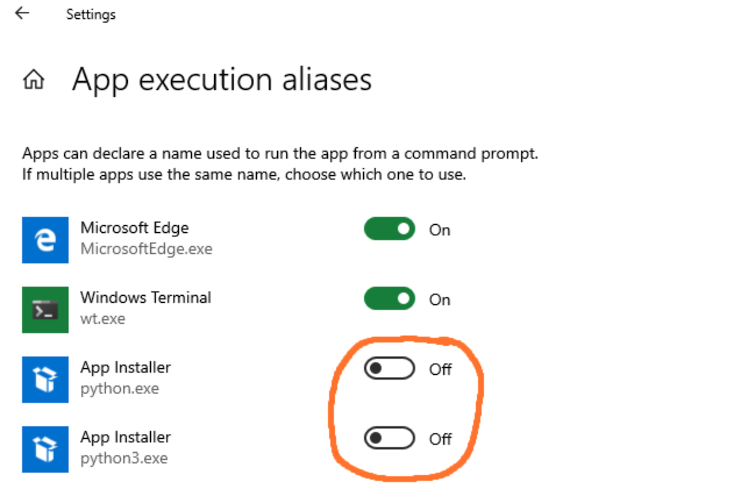
Then, you need to find the control panel for managing app execution aliases
and switch off the aliases for python.exe and python3.exe, as shown in the captured
images below. A quick way to find that control panel is by typing manage app execution
aliases into the Windows search prompt.

Restart the Git Bash terminal window and try again:
$ python3 --version
macOS
If you have an Apple computer running the macOS operating system, then you have by default a system-wide installation of Python 2.x. You can check that by opening the Terminal app and typing the following:
$ which python
/usr/bin/python
$ python --version
Python 2.7.16
The lines without an starting dollar sign ($) indicate the output you should
be seeing in your terminal window. It may happen that the last line gives a 2.x.y
version but with a different minor (x) or revision (y) version numbers than the
ones shown here.
Installing and maintaining a Python installation in macOS may become complicated, see this xkcd joke. For this reason, it is recommended to use a package manager software such as Homebrew to install Python 3.x and Jupyter Notebook, through the following two steps:
- Install Python3 using Homebrew as follows:
$ brew install python3You can check whether the installation has been successful by typing
$ which python3
/usr/local/bin/python3
$ python3 --version
Python 3.8.5
Again, it may happen that the last line gives a 3.x.y version but with a different minor (
x) or revision (y) version numbers than the ones shown here. - Install Jupyter Notebook using Homebrew as follows:
brew install jupyterlabYou can check whether the installation has been successful by typing
$ which jupyter
/usr/local/bin/jupyter
iOS
To install Python in an iOS device you need first to install iSH (see previous instructions about installing a Unix shell in iOS) and then type the following commands on the Unix shell:
$ apk add python3
To check whether the installation has been successfull, type:
$ python3 --version
Python 3.8.5
Again, it may happen that the last line gives a 3.x.y version but with a
different minor (x) or revision (y) version numbers than the ones shown
here.
Python modules
To install additional modules in Python, such as numpy, pandas or matplotlib,
you can use the pip tool as follows:
$ pip install <modulename>
where you should replace <modulename> by the name of the module you want to install
(e.g., numpy, pandas or matplotlib). Note that if you installation of Python
version 3.x is available in your system through the executable python3, then you
will have to use also the pip3 tool, by doing:
$ pip3 install <modulename>
If you are on Windows, using the Git Bash Unix shell, you may encounter the
error below when using the pip or pip3 tool.

In such a case, first install the pipwin module as follows:
$ python -m pip install pipwin
Second, install every other module as follows:
$ python -m pipwin install <modulename>
where you should replace <modulename> by the name of the module you want to install
(e.g., numpy, pandas or matplotlib). Remember to replace python by python3
in the previous instruction if your Python version 3.x installation is available through
the python3 executable.
R and RStudio
To install R and RStudio you must first install R and then RStudio.
Unix
To install R in a Unix (Linux) OS, go to
https://cran.r-project.org,
follow the link “Download R for Linux”, select
the linux distribution and follow the given instructions. If you get a list of files,
follow the link of the file called README.html to obtain the instructions.
To install RStudio in a Unix (Linux) OS, go to
https://rstudio.com/products/rstudio/download,
select the download link under RStudio Desktop (Free), and finally download the
installer file for your Linux distribution and install it according to the corresponding
package manager. For instance, in the case of a Debian/Ubuntu distribution, once the
.deb file is downloaded, you should be able to install it in your system by typing
the following on the Unix shell:
$ sudo dpkg -i rstudio-x.y.z-arch.deb
where x.y.z refer to the RStudio version and arch to the processor architecture
(x86_64 or amd64).
Windows
To install R in a Windows OS, go to
https://cran.r-project.org,
follow the links “Download R for Windows”,
and in the next page
“install R for the first time”.
Finally, follow the instructions in the loaded page, which essentially consist
of downloading an installer program (a .exe file) and executing it in your
computer to install R. If you need to be able to use R from the Unix command
line (see section below on pandoc), using a
text editor you should create a new file called .bashrc in
your home directory and add the following line:
$ export PATH="/c/Program Files/R/R-4.2.2/bin":$PATH
where you should replace the added path /c/Program Files/R/R-4.2.2/bin by
the path in the filesystem where the R executables have been stored. If the file
.bashrc already existed, open it in the text editor and add
the previous line to the bottom of the file. Once you have created or updated
this file .bashrc, you need to exit the current Git Bash terminal window and
start a new one. In this new terminal window you should then be able to see that
the R executable is available by typing:
$ which R
To install RStudio in a Windows OS, go to
https://rstudio.com/products/rstudio/download,
select the download link under RStudio Desktop (Free), and finally download and run the
installer file (RStudio-x.y.z.exe) for Windows.
macOS
To install R in macOS, go to
https://cran.r-project.org,
follow the link “Download R for (Mac) OS X” and
download the .pkg installer file for the latest release of R.
To install RStudio in macOS, go to
https://rstudio.com/products/rstudio/download,
select the download link under RStudio Desktop (Free), and finally download and run the
installer file (RStudio-x.y.z.dmg) for macOS.
Android
To install R in an Android device you need first to install Termux (see previous instructions about installing a Unix shell in Android) and then follow the steps 2 and 3 from these instructions.
Currently, there is no support to run RStudio on a mobile device (see this link). One alternative, is to run RStudio on the cloud provided by the UPF and called myapps. If you use the myapps cloud, you don’t need then to follow the previous instructions to install R in your device, unless you want to have the possibility to run R commands without an internet connection.
iOS
To install R in an iOS device you need first to install iSH (see previous instructions about installing a Unix shell in iOS) and then type the following commands on the Unix shell:
$ apk add R
$ apk add R-dev
$ apk add R-doc
Currently, there is no support to run RStudio on a mobile device (see this link). One alternative, is to run RStudio on the cloud provided by the UPF and called myapps If you use the myapps cloud, you don’t need then to follow the previous instructions to install R in your device, unless you want to have the possibility to run R commands without an internet connection.
Pandoc
To automatize workflows, we cannot use an IDE such as RStudio and we need to
script everything in the Unix command line. To be able to process R Markdown
documents, i.e., .Rmd files, into HTML files from the command line, without
RStudio, we need to install a software component called
pandoc.
Unix
Go to the pandoc installer page and download the latest installer for the corresponding Unix distribution. If you don’t find the package installer file for your Unix distribution, use the package manager to search for it. As last resort, you can alwasy download the source code and try to compile and install it manually.
Windows
Make sure you can call the R executable from the command line. This implies
that you have followed the instructions for windows on how to update the
PATH variable in the
section on installing
R and RStudio.
Now, go to the pandoc installer
page and download the latest
installer for Windows (the .msi file).
macOS
Having Homebrew installed (see section on Unix shell), type the following instruction in the terminal window:
$ brew install pandoc
Makefile
One way to automatize workflows is using make and Makefiles.
Unix
You don’t need to do anything, make is part of a default Unix installation.
To verify that you can use make, just type in the terminal windows:
$ which make
and should show you the path to the make executable.
Windows
In Windows you need to install the so-called Git for Windows Software
Development Kit (SDK). Go to GitForWindows, scroll
down to the bottom of the page, and follow the link called Download Git for
Windows SDK. In the following page, download and execute the installer file.
macOS
If you installed the Xcode CLT following the instructions in the
Unix shell section, then you should already have make as
part of the installation of the Xcode CLT. To verify that you can use make,
just type in the terminal windows:
$ which make
and should show you the path to the make executable.